During a recent thrift store run, I bought my son a nice button up shirt.
I didn't notice that it had a hole right along the side seam.
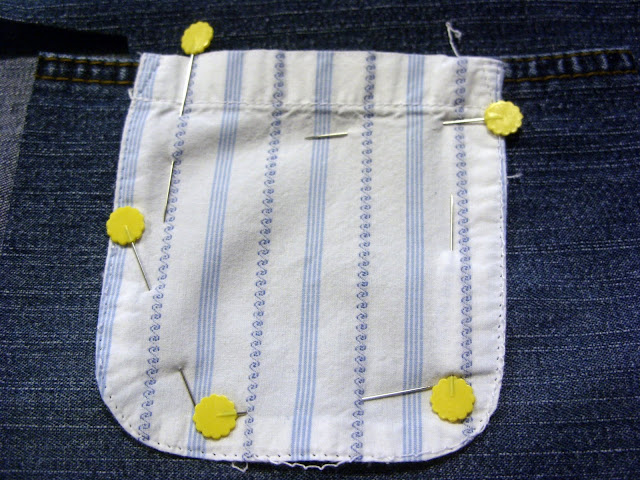
So here is what I did. I picked off the pocket and used it to make another pocket out of a cut jean pant's leg. I made sure to use the inseam as a hem for the new pocket.
I sewed on the jean pocket using the outline of where the old pocket used to be.
You can see the stitch outline on the shirt.
My machine had red thread and I just went ahead and went with it.
Using the original pocket, I made a patch for the hole. I wanted to line up the pattern of the shirt to the pattern of the pocket. It wasn't perfect, but it was much better than the hole.
I also wanted to reinforce the patch, so I cut a piece of a cotton white sheet to add to the inside of the shirt. To fuse it together, I used fuseable web. (This picture shows the fabrics before I cut them into squares to fit over the hole.)
I ironed fuseable web to the white cotton and peeled the backing off. I then sandwiched the pocket patch, the shirt hole and the white cotton fabric and ironed it together. In essence what you want to do is fuse the white cotton fabric to the pocket patch through the hole...whew...I really hope I haven't lost you here.
Then I sewed (I did change the thread here) along the patch. I added the stitched X as an after thought. I think it gives the shirt an added detail, like something you would find on a Gap or Old Navy shirt.
The jean pocket detail also gives the shirt a designer look...
You can't tell where the hole was...you really need to look hard for it...
Now, I just need to wait for my son to grow into it. Not only did I not notice the hole in the side seam, I also didn't notice the size. It should fit him next spring. I think I was distracted by the price tag of .99 cents. And so the Gapified shirt hangs patiently in my son's closet.


7 comments:
Great fix for a 99 cent shirt! Can't beat that price!!
Hello there.. Officially following you from Boost My Blog hop today.. Lovely blog.. Awesome posts.. Settling in to read some more.. ;)) Hope you can stop by my blog sometime.. I'm Marilyn from http://theartsygirlconnection.blogspot.com .. Ciao :))
Your right, it does give it a gap or old navy look with the x. i am going to have to remember this one! Thanks for linking up with DIY under $5!
Carmen,
What a fabulous tutorial! And if I may say so, the pocket you added gives the shirt that touch of debonair it otherwise would have been lacking :) In the future I will think hard about tossing out a shirt I might be able to salvage with your idea. I'm not so much a whiz with a sewing machine, but can operate a needle and thread well enough :) Thanks for sharing!
Emily,
your blog is is lovely . . . I've had so much fun clicking on your tutorials and looking at the pictures of your lovely family! I look forward to trying a few of your tutorials out in the future! Those V-day cards are adorable, too!
Please feel free to check out my blog; it's still quite new in the making, but I upload a tutorial every Tuesday for my readers and have other bits of inspired life published on there as well!
Take care,
Cara
Argh! I just checked to make sure my comment showed up, and I saw that somehow a comment from earlier was pasted into yours. So sorry about that. I've had that happen on my blog, too, so if you like, go ahead and delete and I will re-comment.
Thanks again, Carmen, for the shirt tutorial :)
consultez le message ici www.dolabuy.su vous pouvez essayer ici dolabuy hermes passez sur ce site Web Chloe Dolabuy
n0j70z8a87 z9o43k1g65 s5m87c1w13 f0g83i2w44 x5s40t2t75 d1g17p5v09
Post a Comment